Spring is just around the corner! I am SO ready! One of the things that I did to prepare for this amazing season, was to transform my dramatic play center into a Flower Shop. This was a perfect opportunity to introduce some spring STEM activities to my class. We had a couple of different things prepared. We created the ‘Life Cycle of a Plant’ booklets, we sorted silk flowers by color, we planted letters in our soil, and we created magnetic flowers that ‘grow’ with a magnet! This dramatic play center is easily one of my favorites.
I love incorporating different learning facets into my dramatic play center. I encourage writing by including a ‘menus’ or ‘shopping order’. We count and practice number recognition with money or flowers. We practice letter recognition with our ‘planting letters’ activity and the “Life Cycle of a Plant’ booklet. I won’t lie…bringing science into my center is something I live for. I love science! So this growing flowers activity is one of my favorite spring STEM activities to do.
Spring STEM Activities – Growing Magnetic Flowers
Planting and growing flowers take a LONG time. TOO long for my preschool children. I think there may be a bean growing activity soon, but that is a topic for another day! Right now, my children and I can ‘grow’ flowers using a different science topic: MAGNETS!
I started out our discussion by bring the class together during circle time. We inquired and investigated the properties of magnets. Using some pre-gathered materials, my class informally created and tested their own hypotheses. After our small group investigations, each student was given the opportunity to search for and discover their own magnetic items.
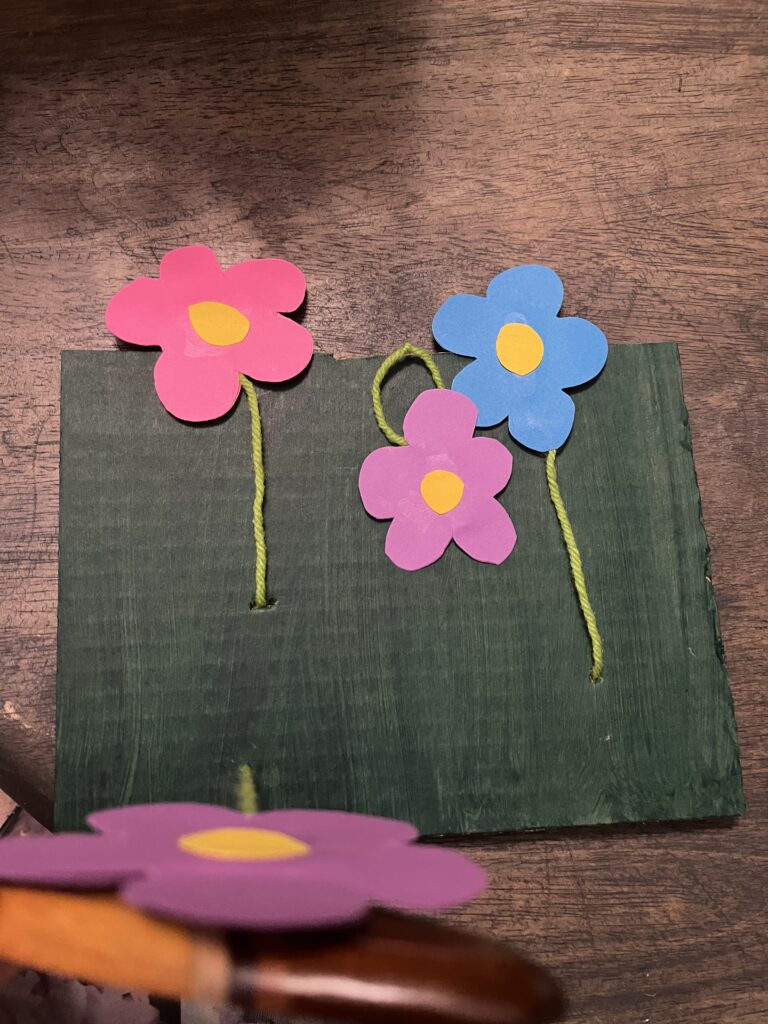
After our discussion and discovery time, I brought out our magnetic flowers. These flowers were created by gluing together pieces of cardstock, string, and paper clips. The spring became the stem, which was attached to a piece of painted green cardboard.
Next, I glued two pieces of cardboard, cut to look like flowers. Inside of these flowers the string and a paper clip.
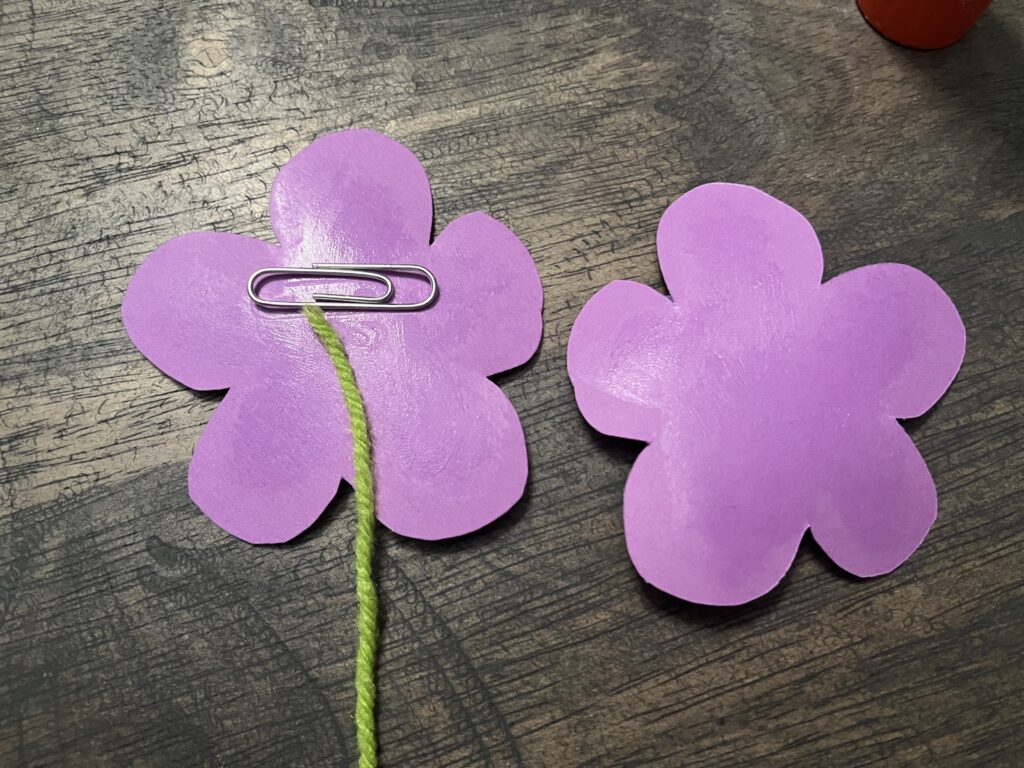
This created the illusion of a growing flower when the magnet approached the flowers!
Skills to Practice at Home.
This post may contain affiliate links, which means I’ll receive a commission if you purchase through my links, at no extra cost to you. Please read full disclosure for more information.
Some Things You Will Need:
- Paper
- Scissors
- Paper clips
- String
- Cardboard
- Magnets
There are a couple of opportunities to engage your child and bringing them into the design process for these spring STEM activities.
First: Have your child draw the flowers! Remember you need two flowers for one magnetic growing flower. #Pro Tip: Use a paper that is thin but still has enough mass to support the weight of a paper clip. The thicker the paper, the more difficult it is to pick up with the magnet, depending on your magnet. The magnets that we use in our class are awesome! They are easy to hold and sometimes they act as magic wands!
Second: Have your child cut out the flowers! This task can be a challenging one. As your child is developing the muscle memory in their hands and they are improving their fine motor skills, this activity will get easier for them. The best way to do this is to practice! I love these scissors because of the cap! No matter how much we stress how to walk with scissor, not everyone will walk with scissors properly every time! My students start with straight line cutting.
So…on the down low…go to Canva. On their templates search cutting practices. Now a lot of these templates are Pro or Paid templates; however, there are some free cutting practices that contain straight and zigzag lines. These are great places to start!
Third: Have your child tie knots to hold the flower down to the cardboard! I love this because your child will be able to practice fine motor skills and practice the skills they will need later on.

Fourth: I made a point to do this step with my class! Discuss magnetic materials. Without the proper foundation as to what is causing the flower to rise, you may run into the misconception that it is the paper that is magnetic. Without realizing it, students may not think about the paper clip inside, especially if they were not present for creating the flower!
Reading for Enrichment!


Spring is my favorite time of the year. I love to see the growth of new plants and the blossoming of new flowers. I am so excited to share some of my spring STEM activities with my class and with you! Did you create your own magnetic garden? How did it turn out? Did something about the activity surprise you? Leave your thoughts below! I look forward to sharing this learning journey with you!