Textures are wonderful! I love to incorporate different textures into my classroom and into my home. Textures add a sensory element to an outdoor STEAM activity that engages most of the children in my classroom. One thing about texture that I love is when it is included in art. One of my favorite pieces of artwork, that I would have totally bought if I had won the lottery was created by Dana Berardinis. She is a Montana artist that creates the most beautiful landscape paintings using texture and natural elements such as straw. I am already WAY off topic, so let me get my thoughts back on track…texture in art can create new, unique aspects that make you look at something simple and see it in a new light.
One thing technique that I like to embrace with my class is the imprinting process. I think of it as a similar process to stamping but in reverse! Maybe you have seen it done before. Someone places a penny under a piece of paper and color over it. Or maybe you have unintentionally done this before. Maybe you are coloring on a textured table and while you are coloring you see a line from wood grain start forming on your picture. These are imprints!
Today I wanted to use the imprinting process to show the different details found in natural elements such as a leaf, a slice of wood, bark from a tree, grass, really anything! The only limit here is your imagination!
Aspects of This Outdoor STEAM Activity
Remember, a steam project should contain at least two aspects of the core components: science, technology, engineering, art, and math. For this outdoor STEAM activity we can engage a child on at least two different aspects:
Science
With the imprinting process, your child will need to go out and explore their natural world. Finding, collecting, and categorizing are all aspects of this activity that will play into their understanding of their natural world. Have your children collect sticks, rocks, flowers, leaves, or anything else that they can find. Have your child separate them into different groups based on similarities. For example, Grow and Does Not Grow, would be two categorize that a child would be able to separate natural materials into. You can have your child separate things into groups based on colors. You can have your child separate things into groups based on weight. There are endless possibilities on how you and your child can organize natural materials into groups. This categorizing and organizing skill is a skill that will build upon your child’s understanding of their natural world.
When you are doing the imprinting with a crayon and paper, the details of the item will start to show. You can start to see details in leaves, flowers, rocks, or wood. Have your child try to explain these details. What is causing the marks that they are seeing? Why do they think the marks are appearing? Throughout the process, you can engage your child by asking them questions about how they did something, why they did something and what they could do to see a specific result. Allow your child to think through options and come up with a solution! Children come up with amazing ideas that I might never think of myself and that is what I love about these activities!
Art
When the design process is being started, you can start introducing and integrating colors into the process. Have your child think about the placement of their materials. Watch to see if they are intentional with their placement. Practice colors with them and see if they choose a specific color for a specific item. Experiment with layering!
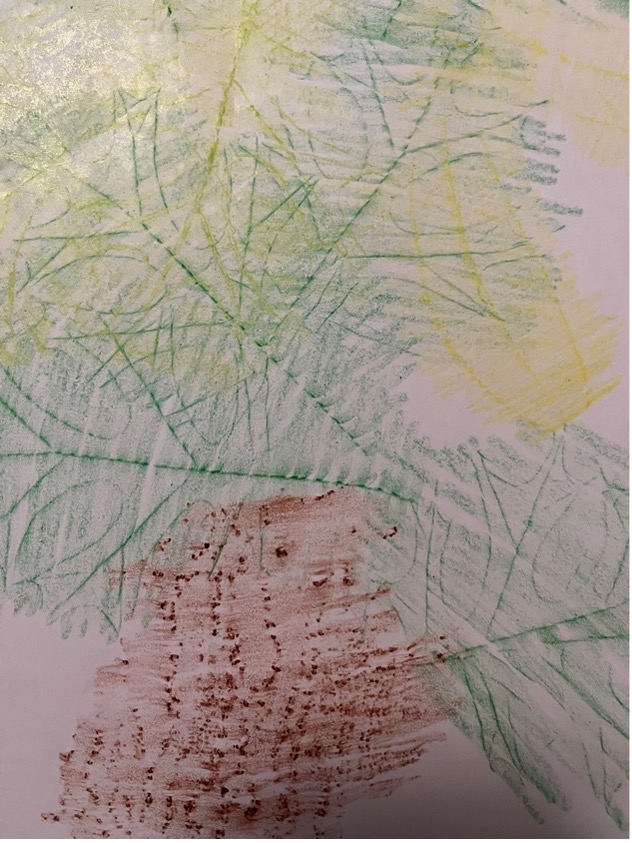
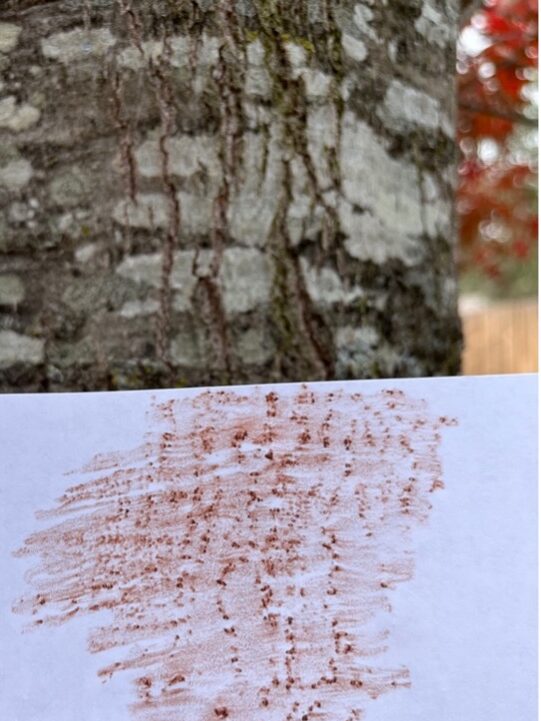
Create a picture with natural materials. Using leaves, flowers, sticks, your child can create an imprinted picture of a flower bush! The possibilities are limited only to your child’s imagination! Do you have palm trees in your area? Pine trees? I love working with bark, as they can produce some of the best images!
Materials for this Outdoor STEAM Activity:
This post may contain affiliate links, which means I’ll receive a commission if you purchase through my links, at no extra cost to you. Please read full disclosure for more information.
- Crayon
- Paper – the thicker the paper, the less detail you will see
- Natural Materials – you will see more detail when your materials are dry and flat!
- Clipboard/binder/flat surface – something to draw on!
Creating your imprinted masterpiece!
For this outdoor STEAM activity, I encourage you to take a trip outside with your child. Take a walk to the park. Pick up dried leaves, grass, or any natural materials. It is a great idea to bring a clipboard or flat surface to draw on! It creates an opportunity for your child to explore nature, in nature. Watch your child draw inspiration from the natural world around them. Engage them by asking them what plants they see. What are their favorite parts? What colors do they see? While I may have experimented for you and gave you a heads up of what will work best, let your child figure that out on their own! Show them an example and then let them pick things and discover the art process for themselves! Challenge them to draw a picture of a tree using imprinting. What parts of the tree do they need to include in their picture? This will help them think about the natural elements of a tree. The tree has a trunk, leaves, branches. Maybe your tree has fruit or flowers. So how are you going to do it?
There are a couple simple steps:
- Pick your natural material
- Place it on your flat (I highly recommend a smooth surface too, otherwise you will see the imprint from your surface too)
- Place a paper on your surface (I used computer paper)
- Color over the object

This outdoor STEAM activity works because when the crayon hits a ridge or a shallow area, and the same amount of pressure is applied, it will cause dark and light areas on the picture!
That’s it! It doesn’t require anything fancy or complicated. You don’t need to go out and buy anything! Use what you have at your home! This activity is one of my favorites because it is so simple. Evie and I can go out and walk around, we can stop and color, then go back to playing! During this process, she is picking up leaves, rocks, sticks and she is learning about them through exploration! We practice saying the item when she picks them up and we move on when she’s done!
Thank you for reading! How did it go? Did your child explore colors and textures with the things around them? What did you use and how did it go? Feel free to share what you thought of this outdoor STEAM activity! I love to hear everyone’s experiences!