As a parent, I feel like the moments that I spend with my daughter are fleeting. One day she lifts her head up, the next she is crawling, then walking. I don’t know where the time went but it went somewhere. Now she is running! I wanted to create something with Evelyn to mark these milestones in her life, create a way that the many firsts of her life live on. We created a movement mural.
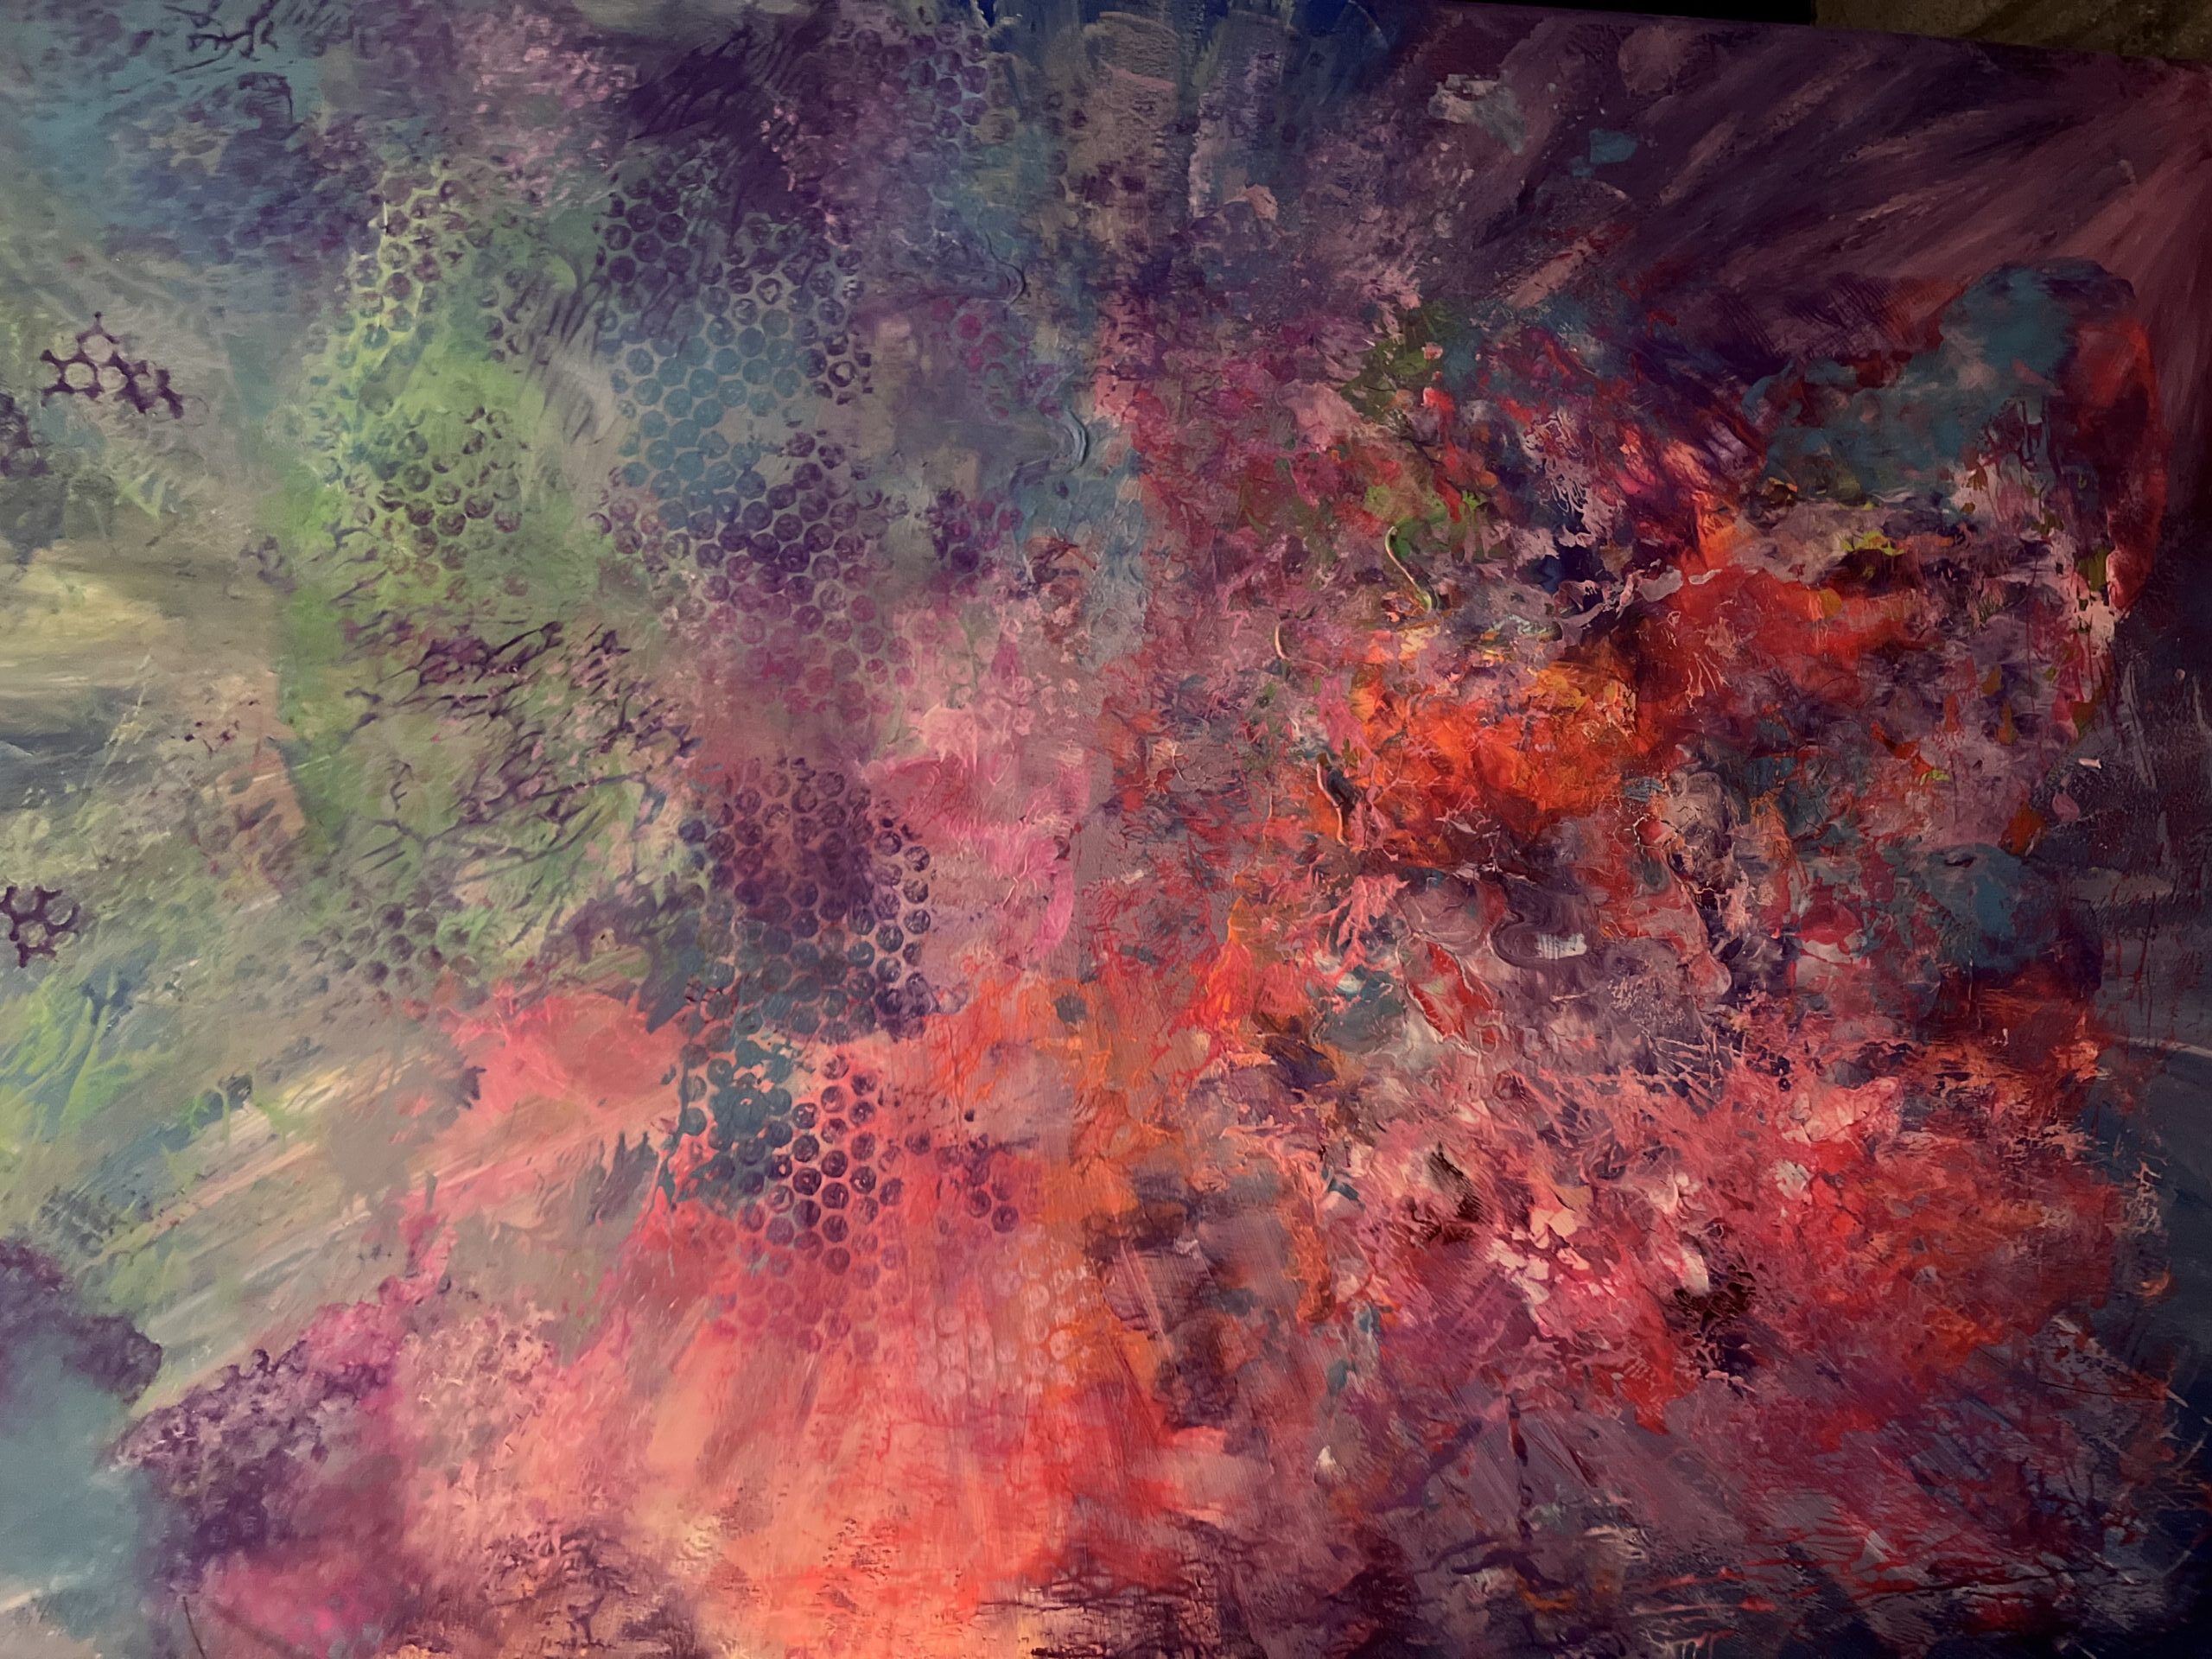
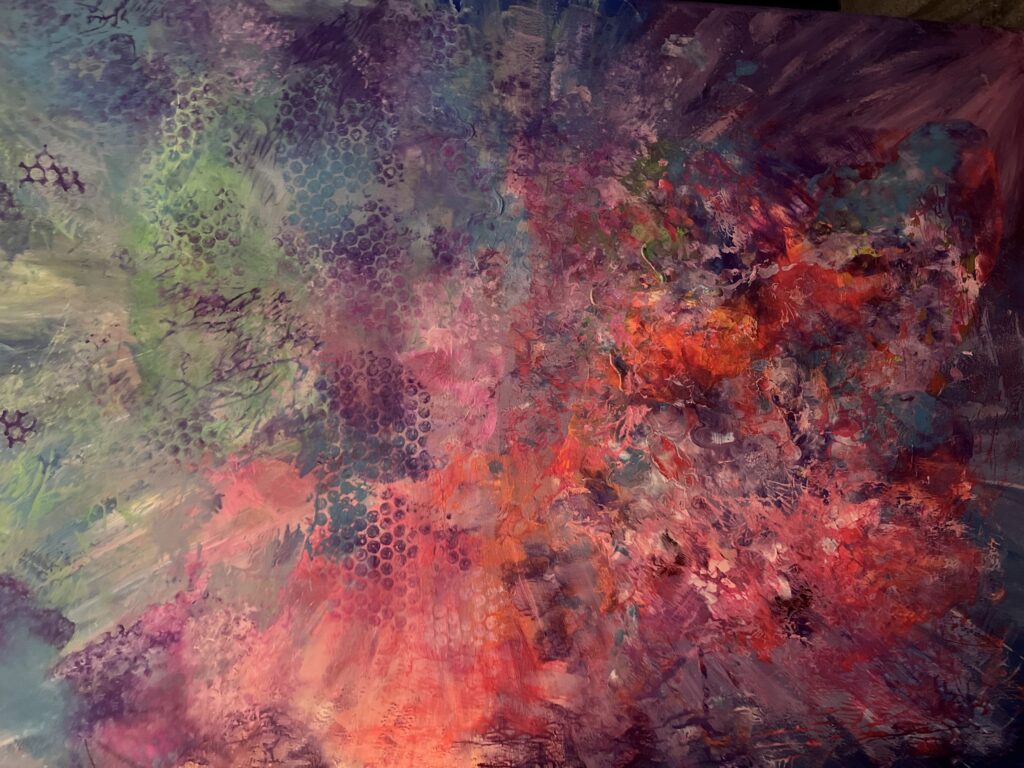
A movement mural is just that: a mural created by your child’s movements. This art project is an exciting way to engage your children in a craft that they can be a part of! Without much prep-work, and an amazing finished product, this is one of my favorite ways to capture a moment in time. One of my most cherished paintings is one my daughter made when she first learned to crawl. The best part of these movement murals is that you can adapt and change the process for nearly any point in a child’s life. The important part is not the finished product, but the process of creating the masterpiece!
Materials for Your Movement Mural
This post may contain affiliate links, which means I’ll receive a commission if you purchase through my links, at no extra cost to you. Please read full disclosure for more information.
The best part of this art project, is that it requires only a couple of things:
Paper/Canvas
Paint*
Plastic Bag/Plastic barrier
Tape
Sealant
My first movement mural was underwhelming and really messy. We used zip bags, washable paint, and card stock. It was super simple and easy to set up. I put in Evelyn’s daycare teachers’ favorite colors, set Evelyn into her highchair, and let her whack the bag! Evelyn managed to open the small bag I had been using to contain the mess and SPLAT! Along the way, I have learned a couple of things and I’m here to share these tips with you!
Here’s how to create your own movement mural:
First, pick a paper size!
I have done small tabletop paintings and large canvas paintings. All you need to do to get started is to pick your paper or canvas! If you are planning on starting with a small paper art project, I recommend starting with a thicker paper, like cardstock. From my experience, a thin piece of computer paper will we extremely difficult when it comes time to remove it from the plastic. Also, the bigger the project, the move time it will take to complete. For my large canvas, it took Evie a week and a half of small painting sessions. For full coverage, you may need to set the painting aside, let it dry and come back to it later.
Second, pick your paint!
I LOVE washable paint. If there is even a possibility of our projects getting messy, the washable paint is always my first choice. With that being said, if you plan on doing a large canvas, BEWARE of drool. Right around the time that Evie was crawling, she started to teeth again. I didn’t notice the drool until she crawled right over it and it smeared the washable paint. The smear looked kind of cool! Again, it’s the process, not the product; however, she was COVERED in paint. For these projects, I just put down a couple of blobs of paint and covered it up with plastic. For smaller children, I do recommend putting the paint blobs closer together. It is easier for them to start mixing the paint.
Third, find mess protection!
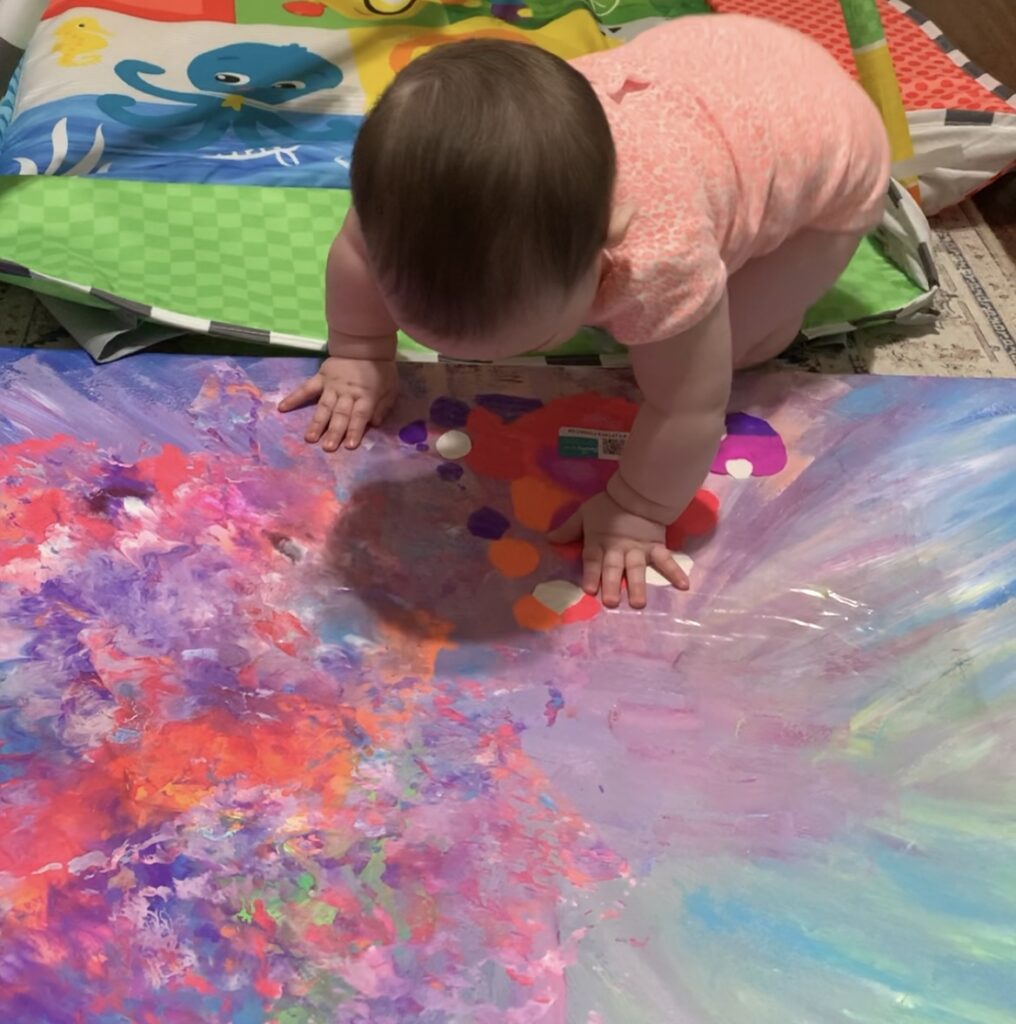
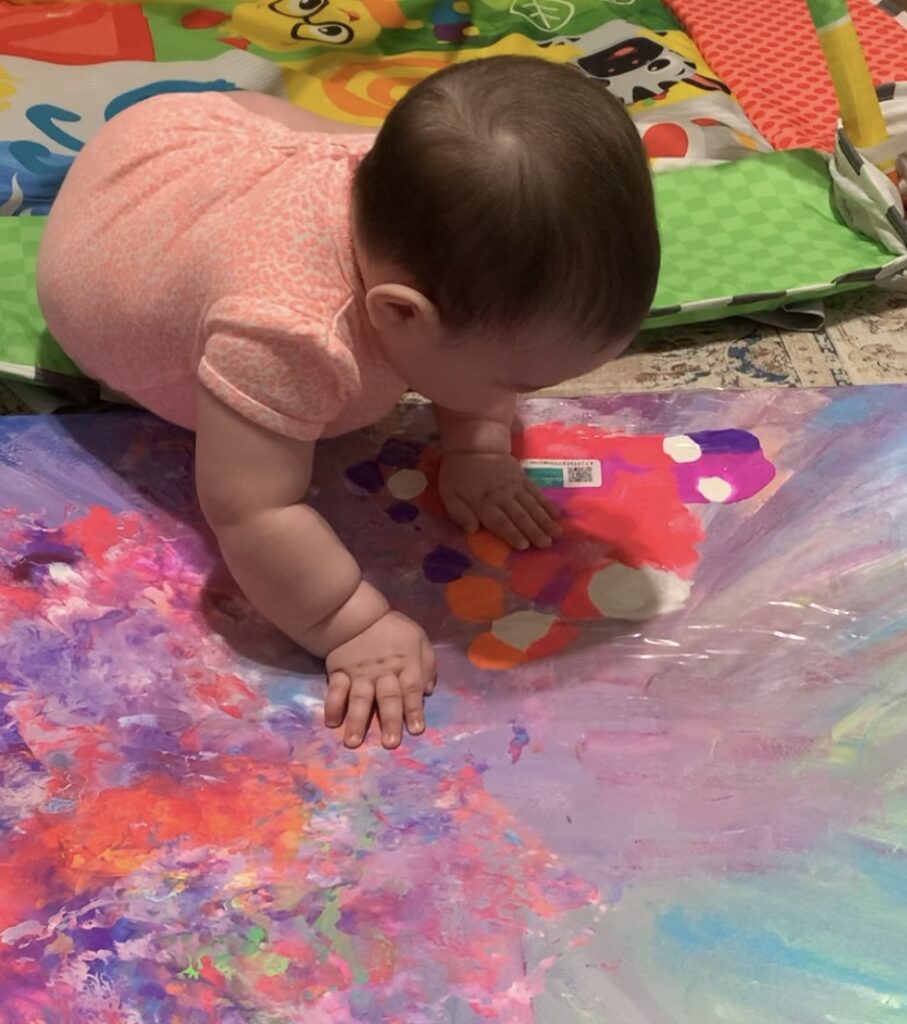
Zip bags work great here, assuming it is small enough to fit in the bag. If you choose to do a large painting, zip bags won’t work. I used painters’ tape, so that the tape didn’t ruin and existing art, and the plastic wrap found in diaper packaging. I loved this plastic! One, I didn’t have to buy plastic. Two, it was thick. You know the struggles with baby nails. They are small and sharp! The thicker the plastic the better! Experiment with different plastics! We even used bubble wrap once! It’s a great way to introduce your child to new feelings and even sounds if they smack it hard enough!
Fourth, create!
When I did my large canvas with Evie, I placed her in the middle of the canvas (or on top of the sectioned portion of the canvas) and let her do her thing. This activity was a great activity to practice gross motor skills, as she had just started to crawl. She loved interacting with the paint and loved squishing it. One of the cutest parts of the painting is where is used her arms to drag herself across the painting. I didn’t expect her to be too interested in the process, however, she truly enjoyed the colors and the different textures. HEADS UP! The larger the canvas, the more support you will see on the wooden frame behind the canvas. If you use a canvas, be mindful of the supports on the back. I’m sure baby would be a little upset if she was crawling around and stubbed her hand or knee on the wood underneath! To avoid this, I used a blanket underneath the canvas. This prevented Evie from creating a dip in the canvas and hurting herself when she crawled across.
Fifth, use sealant!
This step is critical if you are using washable paints! Drool and washable paints create a big messy mess on baby. Sure, it washes off, but we all know we want to avoid the mess in the first place! I will be honest; I learned this lesson the hard way! Evie had started cutting a tooth, so we took a couple of days off from painting and did more ice projects! Anyways, when we came back to the painting, she was still pretty drooly. Not only did it cause our washable paint to smear, but it also made her look like the artwork rather than the canvas! With any keepsake, you want the peace of mind that it will last, and the sealant will help you do that. I recommend that you do not skip this step. For this step, I used Mod Podge sealant, but any sealant would do!
I hope you found this post exciting! It was so much fun to be able to create with my child and I’m sure yours will love this experience too! I would love to see or hear how yours turns out! Feel free to post a picture of your masterpiece or share any comments below!